

A slab’s stability starts below the concrete. Soil stabilization for concrete slabs means mixing cement into suitable soil, then adjusting moisture and compacting the blend to create a stronger, more stable base. Cement soil stabilization typically uses cement equal to 3% to 8% of the dry soil’s weight, with the right amount depending on the soil and project design.
The cement ratio is only one part of soil stabilization for concrete slabs. Soil testing helps determine whether cement treatment is suitable and how much cement to use. Uniform mixing, compaction, and curing then help the treated soil develop strength and support a more stable slab.
This guide explains how cement stabilization works, how it compares with other methods, and what to expect during testing, preparation, mixing, compaction, and curing. It also covers how to protect treated soil as it gains strength, and when professional concrete leveling may be a better fit for an existing sunken slab.
Soil stabilization for concrete slabs strengthens supporting soil by blending cement into it and compacting the mixture. The treated layer can resist deformation and distribute slab loads across a firmer base. Results depend on soil type, cement dosage, moisture, mixing, and compaction. Geotechnical testing helps match these factors to the project’s required strength.
Compressive strength offers one way to assess the benefit. Typical seven-day unconfined compressive strengths for cement-treated base range from 300 to 800 psi. That range describes treated base material, not a universal target for every slab. A geotechnical design sets the appropriate performance criteria based on the soil, expected loads, and site conditions.
What are the risks of poor soil stabilization beneath a concrete slab? Weak or uneven support can cause different parts of the slab to settle at different rates, leading to cracks, surface changes, or reduced load-bearing capacity. Moisture variation and inconsistent compaction can create weak spots, which is why test results and uniform field work matter.
The Des Moines International Airport project illustrates how mix design connects cement dosage with strength requirements. Project-specific strength requirements can guide the cement mix design. The case study selected a 4% cement dosage rate, using approximately 38 lbs per sq. yard at that rate.
Testing also showed why dosage must follow measured performance rather than guesswork. In the Des Moines case study, each tested cement dosage increased compressive strength by 100-300%. The project’s final cement design was increased first to 6% and then to 8%. Those project-specific values demonstrate the role of testing; they are not a standard recipe for residential slabs.
Strength is only one part of load-bearing performance. A well-mixed, compacted layer can help limit particle movement under repeated loads, while stable moisture conditions support consistent behavior. For example, a slab carrying equipment needs a design based on expected loads and soil conditions, not just its visible surface. Testing and controlled placement help carry that design through to the finished base.
Site conditions also affect the outcome. Soil moisture influences the cement-soil reaction, and density measurements show whether compaction meets the design. A practical sequence is to test representative soil, set the cement rate and mixing depth, adjust moisture, then verify compaction. Skipping a step can leave weak areas beneath a surface that otherwise looks sound.
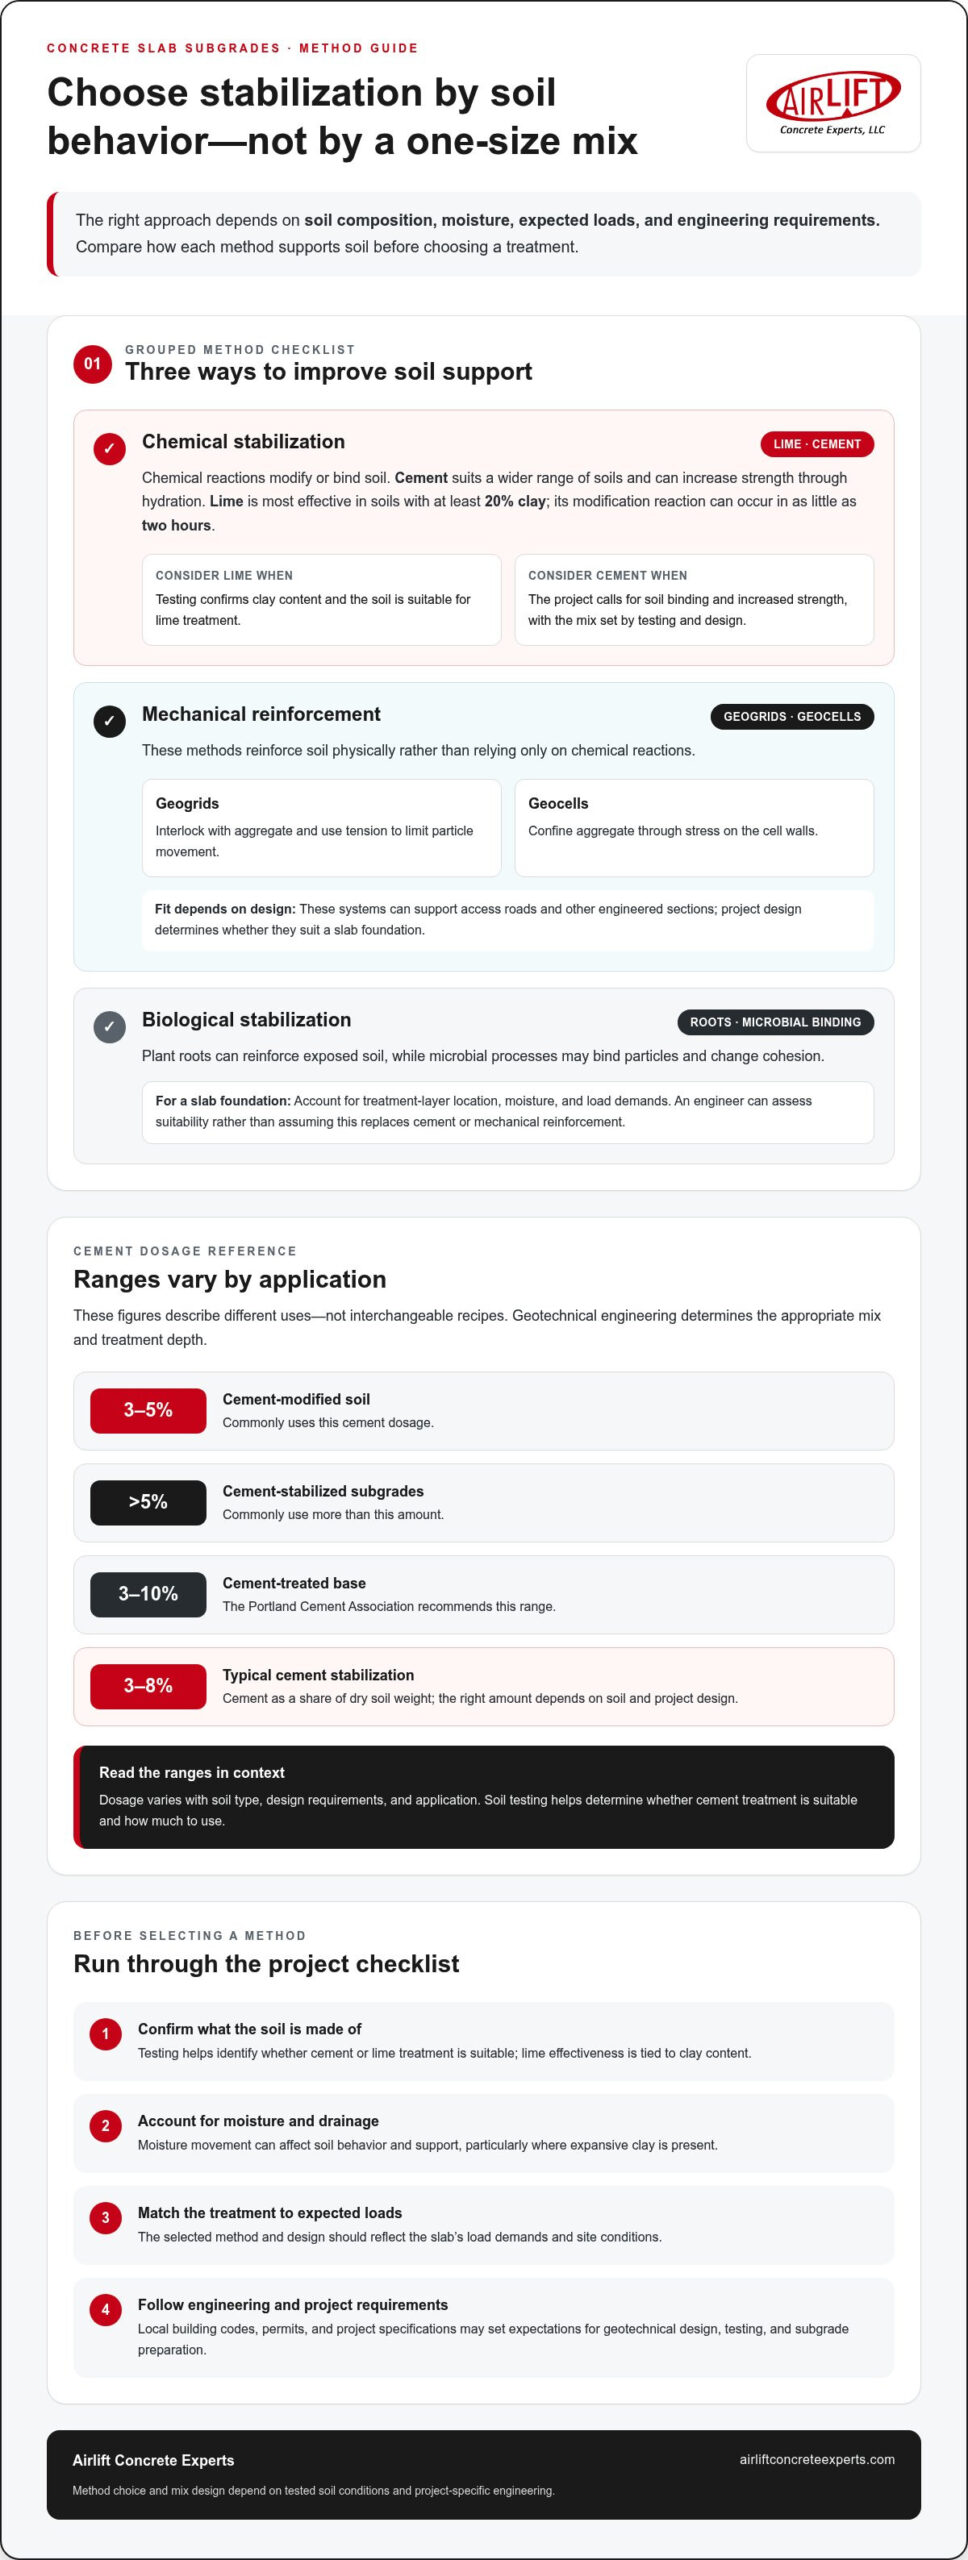
Stabilization changes soil behavior through physical reinforcement, chemical reactions, or biological binding. The right method depends on soil composition, moisture, expected loads, and engineering requirements.
Lime and cement are chemical stabilizers, but they address soil conditions differently. Lime is most effective in soils containing at least 20% clay; its modification reaction can occur in as little as two hours. Cement stabilization suits a wider range of soils and can increase strength through cement hydration. For slab subgrades, testing helps match the treatment to the soil and project demands.
Dosage also differs by application. Cement-modified soil commonly uses 3-5% cement, while cement-stabilized subgrades commonly use more than 5%. The Portland Cement Association recommends 3-10% cement for cement-treated base. These ranges describe different uses, not interchangeable recipes; geotechnical engineering determines the mix and treatment depth.
Expansive clay changes volume as its moisture content changes, which can move or unevenly support a concrete slab. Lime can modify clay, while cement can bind soil particles and improve strength. Lime stabilization is most effective at 20% clay content or higher, so testing helps establish whether the soil suits that approach.
Moisture movement remains important after treatment. The design should account for drainage, soil composition, and the slab’s expected loads. For example, a slab over clay may receive uneven support if one edge becomes wetter than the rest.
Mechanical methods reinforce soil without relying only on chemical reactions. Geogrids interlock with aggregate and use tension to limit particle movement. Geocells confine aggregate through stress on their cell walls. These systems can support access roads and other engineered sections, but project design determines whether they suit a slab foundation.
Biological stabilization uses plant roots or microbial processes to bind soil particles. Roots can reinforce exposed soil, while biological binding may change particle cohesion. Beneath a concrete slab, the design must account for the treatment layer’s location, moisture, and load demands. An engineer can evaluate whether biological treatment suits the foundation rather than assuming it replaces cement or mechanical reinforcement.
Local requirements depend on the jurisdiction’s adopted building codes, permit conditions, and project specifications. They may set expectations for geotechnical design, soil testing, or subgrade preparation, so use the project documents to guide the stabilization plan.
There is no single per-square-foot cost for soil stabilization across the United States. Estimates depend on soil type, treatment depth, cement dosage, site access, preparation, and testing. The price is provided after a quote request.
Method selection also depends on the type of problem. For a new slab, stabilization treats the supporting soil before placement. For an existing sunken slab, polyurethane concrete leveling can address the concrete’s position without treating the soil as a new subgrade.
After cement and native soil are mixed and compacted, the soil-cement reaction continues as the subgrade cures. Keeping the treated layer moist and limiting disturbance help it develop strength. Cement-stabilized soil is usually kept moist for a curing period of seven to 28 days. The project design and site conditions determine the appropriate curing approach within that period.
Moisture matters because cement needs water to hydrate. After mixing and compaction, stabilized subgrade should be at or slightly above optimum moisture content for ideal curing. If the surface dries, the soil may not cure as intended. Crews can monitor the treated area and maintain moisture according to project specifications.
Traffic control protects the layer while it gains strength. Keep heavy turning equipment and unnecessary traffic off freshly treated soil during the soil-cement reaction. Turning or repeated passes can disturb the compacted surface before it develops strength. A clear access plan helps workers avoid crossing finished sections to reach another part of the site.
Protect the curing layer by coordinating work and keeping it intact. Mark completed areas and direct equipment along designated routes where practical. If a delivery vehicle needs to cross the subgrade, plan its route around the work sequence. This reduces avoidable disturbance and helps maintain a consistent treated surface across the slab area.
Weather and site conditions affect how crews manage moisture during curing. Cement stabilization of soil is not recommended when the air temperature is below 40 degrees. That threshold matters before work begins, while the curing plan must also account for conditions that can dry or disturb the exposed surface. Project specifications guide how crews respond to changing conditions.
For example, protect a completed slab subgrade from construction traffic until its curing period is over. Crews can sequence nearby work to avoid crossing the treated zone and monitor its moisture. These steps help preserve compaction and reduce disruption as the soil-cement reaction develops strength.
Curing is not simply waiting after compaction. It is an active period of moisture management and access control. Keeping the treated layer moist, protecting it from heavy equipment, and following the specified seven-to-28-day period support a more uniform base before the next construction stage begins.
A reliable treated subgrade begins with representative soil samples and a mix design. Field preparation and verification help crews achieve the intended structural support.
Soil testing evaluates whether existing soil can be stabilized and estimates the cement application rate. Laboratory testing mixes representative samples with varying cement and moisture amounts, then compacts them and tests strength at different cure times. Samples are commonly collected every 400 ft and usually obtained to a depth of 10 ft below grade. These results help the geotechnical design set the treatment plan.
Before stabilization, measure in-situ soil moisture on the day of work. That reading helps determine cement application rates and whether water adjustments are needed. A mix design should test 3 to 4 cement dosage points; 2%, 4%, and 6% are an example set. The procedure also calls for measuring Atterberg limits one hour after mixing, adding data about the soil’s characteristics.
During mixing, a reclaimer blends cement, water, and soil to the design depth. Cement stabilization is most often mixed to 12 inches, though design requirements can call for mixing as deep as 18 inches. A reclaimer moving too quickly can leave unevenly mixed soil and clumps coated in cement. Controlled passes help distribute cement and moisture through the treated layer.
Water adjusts the mixture to the moisture level needed for the cement-soil reaction. The crew then compacts the soil-cement in place before cement hydrates. Many specifications require compaction within 3 to 4 hours. After final compaction, a nuclear density gauge can check compaction immediately. Moisture and density verification is recommended every 5,000 sq. ft.
There is no single thickness for every slab; geotechnical design determines mixing depth based on soil conditions and structural requirements. Cement soil stabilization is commonly mixed to 12 inches and can extend to 18 inches when the design calls for it. Those figures describe stabilization mixing depth, not a universal thickness requirement for every slab’s base layer.
After compaction, proof-roll the entire stabilized subgrade to identify areas that respond unevenly under loading. Compaction and strength tests, by contrast, are performed at specific intervals. Strength can be assessed with dynamic cone penetration tests or unconfined compressive strength tests on undisturbed samples collected or prepared in the field.
For curing, stabilized subgrade should remain at or slightly above optimum moisture content. Cement-stabilized soil is usually kept moist for seven to 28 days. Protect the treated surface from heavy turning equipment and unnecessary traffic while the soil-cement reaction develops strength. This final care helps preserve the uniform layer established through sampling, application, mixing, and compaction.
Evaluate the soil before pouring a slab if its condition may prevent consistent support. Loose or soft areas, uncontrolled fill, changing soil types, and moisture-sensitive clay can all signal that the subgrade needs attention. These signs call for investigation, not an automatic choice of treatment. A geotechnical assessment helps determine whether soil stabilization or another type of preparation is appropriate.
Walk the proposed slab area and note visible changes before construction begins. A soft patch that deforms under equipment, for example, may indicate weak support. Native soil and placed fill may also respond differently under the same load. Standing water and persistently wet areas deserve attention because moisture affects soil strength and the cement-soil reaction. Map these conditions so soil samples represent the site.
Laboratory testing can show whether cement stabilization is suitable. Representative native soil samples are mixed with different cement amounts and moisture levels, compacted, and tested for strength over different curing times. The results help establish an application rate instead of relying on a generic mix. On the workday, measure in-place moisture to determine whether water adjustments are needed.
Expansive clay deserves particular attention because moisture changes can make it swell or shrink, moving the slab unevenly. Lime stabilization is most effective for soil containing at least 20% clay; cement is another treatment option when the design and test results support it. The geotechnical design considers soil composition, moisture, slab loads, and the depth requiring treatment.
Stabilization depth comes from geotechnical design, not a universal slab rule. Cement soil stabilization is most often mixed to 12 inches and can extend to 18 inches when design requirements call for it. Those figures describe common mixing depths, not a required thickness for every foundation. Soil conditions and structural demands determine the design.
After treatment, verification helps identify weak spots before the slab is poured. Crews can check compaction immediately after final compaction, then proof-roll the full stabilized subgrade. For an existing slab that has settled, the problem is no longer pre-pour soil preparation. Get help with an uneven concrete slab to explore a suitable repair path.
Airlift Concrete Experts provides polyurethane concrete leveling to raise sunken slabs. This service addresses existing concrete, rather than treating soil before a new pour. The distinction matters: soil stabilization strengthens the ground for a future slab, while concrete raising corrects the position of an existing slab. Homeowners and businesses in Malvern, Hot Springs, Little Rock, Cabot, Conway, Benton, Bryant, North Little Rock, Sherwood, Jacksonville, and Hot Springs Village can turn to Airlift for uneven concrete.
When you contact Airlift Concrete Experts about an existing slab, describe where the uneven areas are. The team can assess the concrete and explain whether leveling suits the problem. Contact Airlift Concrete Experts to discuss the next step.
The right next step depends on whether you’re preparing for a new pour or dealing with concrete that has already settled. For a future slab, soil stabilization for concrete slabs is part of groundwork and design. For an existing uneven slab, the focus is on correcting the concrete’s position, not treating it as new subgrade.
Airlift Concrete Experts serves homeowners and businesses in Malvern, Hot Springs, Little Rock, Cabot, Conway, Benton, Bryant, North Little Rock, Sherwood, Jacksonville, and Hot Springs Village. Polyurethane concrete leveling and concrete raising address sunken slabs, while commercial concrete lifting serves commercial surfaces. These services are for existing concrete, not soil preparation for a new slab.
If you’re in one of these Arkansas communities, contact Airlift Concrete Experts to discuss the next step for your slab. A clear path forward starts with identifying what the existing concrete needs.
Use geotechnical testing to evaluate soil strength and confirm compaction across the prepared subgrade. A proof roll checks the full treated area for uneven response, while density and strength tests check specific locations. Compaction can be measured immediately after final rolling with a nuclear density gauge. Strength checks can use dynamic cone penetration or unconfined compressive strength tests on field samples. Together, these results help identify areas needing attention before the slab is poured.
The appropriate method depends on soil composition and the slab’s design loads. Cement treatment can strengthen a range of soils; lime is most effective in soil with at least 20% clay. Geogrids reinforce aggregate through interlocking and tension, while geocells confine aggregate within their cells. For example, a design may favor lime for clay modification or cement when the required soil-cement strength supports that choice.
The project’s geotechnical design sets the target compaction density, since soil type and structural demands affect the requirement. After mixing and compaction, stabilized subgrade should be at or slightly above optimum moisture content for ideal curing. Crews can verify density immediately after final compaction with a nuclear density gauge and conduct moisture and density checks every 5,000 sq. ft. These measurements show whether field conditions match the design.
Start with representative soil testing, then use a mix design to select the treatment and dosage. Measure in-place moisture on the workday, prepare the existing soil, and blend cement and water uniformly to the designed depth. Compact the mixture in place before cement hydrates, then verify density and inspect the full area by proof roll. Keep the treated subgrade moist during its curing period before proceeding with slab construction.

 Call Now